

To start with, we will go through the following topics and also the steps required for deployment:
- What is Angular
- Angular Build
- Angular Deploy
- Deploy using Jenkins
- Jenkins Build & Deployment process
1. What is Angular
- Angular is an open-source web application structural framework maintained by Google for developing complex enterprise web applications or Single Page Applications (SPA).
- It lets you to build applications in HTML and TypeScript. You can import a set of TypeScript libraries into your apps.
- It uses HTML as your template language and extends HTML syntax to express your application components. Its data binding and dependency injection eliminate much of the code you currently have to write.
- An Angular app is a set of Ng Modules, which are the basic building blocks providing compilation context for components.
- The Angular app will have at least one root module that enables bootstrapping and many other feature modules.
For detailed Angular architecture click here.
2. Angular build process
- Local development
- During the development process, we’ll use the following nodeJS command “ng serve” to build, watch, and serve the application from local memory, using webpack-dev-server.
- You can view the application by simply going to localhost:4200
- Production
- If your code is ready to deploy, use the “ng build” command to build the app and deploy the resulting build.
- By default, the output folder is named as dist, wich will contain a set of minified CSS/JS files called by the index.html
- If you need to change the output path, you can do so by editing it in angular.json
Optionally, you can pass the output-path attribute during the build process. For example:
ng build output-path=”/custom-dist”Summary
- Create a production build with “ng build –prod” command.
- Go to the directory of the app and in the “/dist” folder you’ll see the compiled result.
3. Deployment Steps
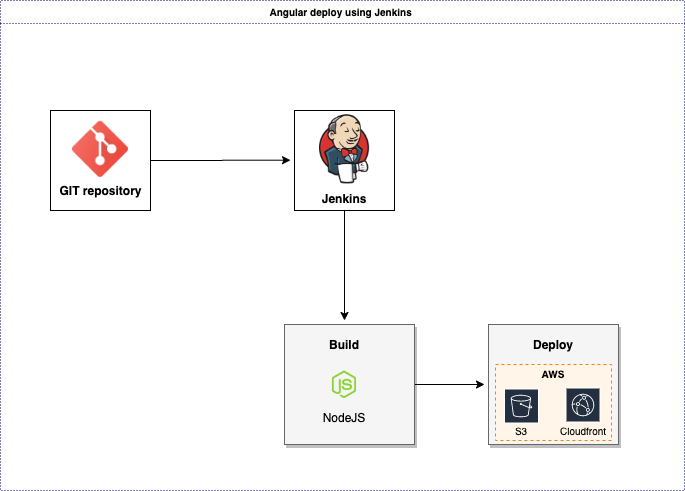
Jenkins
With Jenkins, we will configure job to perform the below steps as shown in the above diagram.
- Pull the code from Git branch
- Use node to build the dist folder
- Then use aws-cli to
- Copy the folder to AWS S3 bucket
- Clear the cache of the AWS Cloudfront distribution
4. Required tools to deploy Angular App using Jenkins
For this process, we need to have the following resources:
- Git command-line tools: If not installed, follow link to install Git
- Node and npm: If not installed, follow the link to install in linux or install in windows
- Python & PIP: A prerequisite for the AWS CLI. If Python 3 is not installed, follow this guide
- AWS CLI: Command line tool for managing AWS resources. Follow this link to install aws cli
- AWS S3 bucket with static hosting enabled: This guide will help you setup static hostingfor AWS S3
- IAM user with AWS S3 upload privileges.
Enable S3 hosting for Angular App deployment:
Please click on the link and complete S3 hosting with your custom domain: S3 Hosting
Configuring IAM user with S3 access:
We need to configure IAM user for aws-cli to upload the files. It can be done in two ways.
1. Using AWS-CLI :
We can run AWS configure command as Jenkins user and provide the credentials.
2. Directly copying the credentials:
- Most of the time, we use multiple AWS services and different IAM users for different uses. So, this is an easy way to configure credentials.
- Copy the IAM credentials as shown in the below format to a file readable to Jenkins user.
- Next, add below command at the starting of deployment script (provided at later steps in this blog)
cp /home/centos/.aws/credentials /var/lib/jenkins/.aws/credentials- The above copy command will access the IAM user while running the job.
5. Jenkins Build & Deployment process
Log into Jenkins and select new item
Give a name in “Enter an item name” to the job and select Freestyle project and click OK.
In the Source Code Management section, select Git and add the Repository URL, credentials and branch name.
Build Step:
Now, scroll down to the Build section and click on “Add build step”. Select “Execute shell” from the drop-down menu.
Now, add the below Build commands in the Command window.
#!/usr/bin/env bash
cd ${WORKSPACE}
npm install
ng build — prod
Deployment Step:
Select Add build step again and choose Execute shell for the second time.
Now, add the below commands to copy the folder to S3 and clear the cache of the distribution:
#!/usr/bin/env bash
cd ${WORKSPACE}
if [ -d dist ]
then
  - aws s3 sync ./dist s3://name-of-your-bucket/ --acl=public-read --delete
  - aws cloudfront create-invalidation --distribution-id your-distribution-id --paths '/*'
else
    echo “the dist folder was not found”
exit 1
fi
The output should be something like the following:
Note: If you are using copy command to configure IAM user, add the command before if statementFinally, save the job to make it ready to run.
The job is now ready to build and deploy when we select Build Now.
If you access the application via the CNAME of the Cloudfront Distribution, you should successfully see your application.